用GitHub-Pages搭建博客及Jekyll主题设置
博客搭建
基本流程
创建 repository
在 Github 注册账号 username,然后新建 repository, 名为 username.github.io ,repository 为 public (公开)。可以不初始化产生README 文件。
选择模板
- 在repository 页面,选择
Settings。 -
在
GitHub Pages区域选择模板:
不过这里想用指定的模板
true minimal,即 https://github.com/cyevgeniy/jekyll-true-minimal/ 。 -
在本地创建某个文件夹,比如
g:\githubRepositories\,用于存放repository。进入该文件夹(cmd):
cd /d g:\githubRepositories\将该repository clone 下来:
git clone https://github.com/cyevgeniy/jekyll-true-minimal.git同样将自己的repository也clone下来:
git clone https://github.com/xienotes/xienotes.github.io.git然后将
jekyll-true-minimal里面的文件全部拷到xienotes.github.io里面,再通过 git 将文件推送到github 上:git add --all git commit -m "first push" git push origin master - 浏览器输入
xienotes.github.io,就打开了我们网站主页,其实就是 repository 里面的index.html。
发布新文章
参见 https://jekyllrb.com/docs/posts/#creating-posts
可在 _posts/ 下面新建文件如 2020-04-25-first-post.md,输入如下内容:
---
layout: post
title: first post
date: 2020-04-25 20:21
tags: [jekyll, github]
category: blog
---
文章内容
然后通过 git 将该文档 push 到远端即可。
自定义域名并开启https
-
到 Namesilo 或者 GoDaddy 上,选择合适的域名,购买;
-
在域名供应商那里添加解析记录(以Namesilo为例):
-
Namesilo 右上角
Manage My Domains,打开域名管理页面; -
点击相应域名后面的蓝色小球
Manage DNS for this domain:
-
然后进入 DNS 管理页,默认已有一系列记录,可以删掉,然后选择下面 Github 的模板,应用:

-
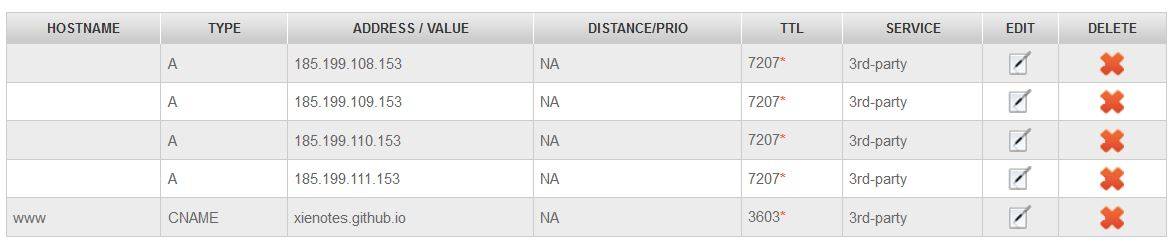
添加一条
CNAME记录,指向我们的域名。 -
所以,总的可能是这样:
-
-
回到 Github Repository
Settings页面,在 GitHub PagesCustom domain处填入刚购买的域名,同时把下面Enforce HTTPS打勾。 -
在
Custom domain填入自定义域名后,GitHub 会自动往 Repository 里面添加一个CNAME文件,里面就是自定义域名,我们将该文件 pull 到本地:git pull -
浏览器输入
xienotes.net,就可以访问了。
主题设置
准备内容
Git
用于本地文件和远端文件的同步管理。
-
从官网下载 Git for Windows
-
命令行进入到 repo 文件夹 (CMD):
cd /d path-to-repo.github.io如具体到本例:
cd /d g:\githubRepositories\fzugeoenv.github.io\。 -
更多 git 使用方式可参见下面更多链接,我们这里主要用如下几个命令:
git add filename,这里更多使用git add --all,即把所有变动(包括修改、删除、增加)都记录下来git commit -m "message",commit 到 HEADgit push origin master, push 更新内容到远端 repo 的 master 分支git pull, 从远端把内容“拉”到本地
-
另外注意隐藏的文件
.gitignore,表示在 git 操作中会忽略的文件,比如我们不希望将_site文件夹上传到github上去。
更多参见:
安装Jekyll
Jekyll 用于生成静态网页。
参照 http://jekyll-windows.juthilo.com/1-ruby-and-devkit/ 在 Windows 环境中安装 Jekyll。
-
安装 Ruby
在 RubyInstaller 上下载安装文件,安装推荐的版本即可。这里安装了版本2.6.6。
-
安装 Jekyll
在命令行中采用
gem安装 Jekyll:gem install jekyll这样就完成 Jekyll 安装了。
-
Jekyll 相关命令
jekyll build: build 整个项目,生成静态网页,放置于_site文件夹中。jekyll serve --port 5000 --host 127.0.0.1,启动本地服务,在浏览器输入127.0.0.1:5000即可查看Jekyll 生成的静态网页,这样我们可以先查看网页情况,然后再 push 到github上。- 注意:1. 因为 github pages 本身支持 Jekyll 解析,所以直接把源码放到 github上就可以,不用将
_site目录下的静态网页上传到github;2. 因此原 repo 里.gitignore里也设置了忽略同步_site文件,在.gitignore文件里加上一行_site即可。
Jekyll 用法
Liquid 语法
模板语言 Liquid,见 https://shopify.github.io/liquid/
归档
在 archive.html 里面填入如下内容:
{% assign postsByYear = site.posts | group_by_exp:"post", "post.date | date: '%Y'" %}
{% for year in postsByYear %}
<h3 id="{{ year.name }}">{{ year.name }}</h3>
<ul>
{% for post in year.items %}
<li>
<span>{{ post.date | date: '%m-%d' }}</span>
<a href="{{site.baseurl}}{{ post.url }}">{{ post.title }}</a>
</li>
{% endfor %}
</ul>
{% endfor %}
这里采用了 group_by_exp filter 对所有的文章根据年份进行分组,并通过关键词 name 和 items 提取年份及相应的文章。
分类和标签
Jekyll 通过 site.categories 提供所有的分类,遍历时,每一项将分别是一个数组,数组第一个元素是分类名称,第二个元素是该分类下所有文章:
{% assign sort_cat = site.categories | sort %}

{% for category in sort_cat %}
  <h3>{{ category[0] | slugify }}</h3>
  <ul>
    {% for post in category[1] %}
      <li><a href="{{ post.url }}">{{ post.title }}</a></li>
    {% endfor %}
  </ul>
{% endfor %}
这里采用 sort 对分类按照该类文章出现的时间进行排序。每个分类的文章的数目可用 size 获取,如 category[1].size。
将上述 categories 改为 tags 就可以用于遍历所有标签,与分类不同的是,标签排序将会按照字母顺序排列,如果想要按照标签数目的顺序排列,可用如下代码:
{% capture tags %}
{% for tag in site.tags %}
{{ tag[1].size | plus: -10000 }}###{{ tag[0] | replace: ' ', '##' }}###{{ tag[1].size }}
{% endfor %}
{% endcapture %}
{% assign sorted_tags = tags | split: ' ' | sort %}
{% for sorted_tag in sorted_tags %}
{% assign items = sorted_tag | split: '###' %}
{% assign tag = items[1] | replace: '##', ' ' %}
{% assign count = items[2] | plus: 0 %}
<a href="#{{ tag | slugify }}">{{ tag }} ({{ count }})</a> 
{% endfor %}
上述代码最后的 tag 和 count 分别对应排列后的标签名及包含该标签的文章数。
参考:
- https://jekyllrb.com/docs/posts/#categories-and-tags
- https://www.gungorbudak.com/blog/2017/12/08/tags-cloud-sorted-by-post-count-for-jekyll-blogs-without-plugins/
搜索
搜索采用了 Simple Jekyll Search,配置过程如下:
配置 search.json 文件
在根目录下创建文档 search.json,填入如下内容:
---
---
[
  {% for post in site.posts %}
    {

      "title"    : "{{ post.title | escape }}",
      "url"      : "{{ site.baseurl }}{{ post.url }}",
      "category" : "{{ post.category }}",
      "tags"     : "{{ post.tags | join: ', ' }}",
      "date"     : "{{ post.date | date: "%Y-%m-%d %H:%M" }}",
      "description" : "{{post.description | strip_html | strip_newlines | escape }}"
    } {% unless forloop.last %},{% endunless %}
  {% endfor %}
]
该文件将用于生成索引文档,包含了文档的标题、链接、分类、标签、日期和文档描述。如果在本地 jekyll build 的话,可在 _site/ 里面查看 search.json 的最终内容。如果需要全文索引, 可把 post.content 也加入,参见 https://github.com/christian-fei/Simple-Jekyll-Search/wiki#enabling-full-text-search,不过文章多了以后,索引文档将会非常大。也许一个可行的方法是在 description 里面加上足够多关键词。
搜索js文件
下载搜索文件,存放于 assets/ 下面。
如果不下载,在后续调用时可以这么写:
<script src="https://unpkg.com/simple-jekyll-search/dest/simple-jekyll-search.min.js"></script>
创建搜索页面
创建搜索页面,如本站 search.md,往里填入:
---
layout: default
---
## 搜索
<!-- Html Elements for Search -->
<div id="search-container">
<input type="text" id="search-input" placeholder=" 标题 日期 标签 分类" style="height:30px;width:150px; padding-left:5px;">
<ul id="results-container"></ul>
</div>
<!-- Script pointing to simple-jekyll-search.min.js -->
<script src="/assets/simple-jekyll-search.min.js" type="text/javascript"></script>
<!-- Configuration -->
<script>
SimpleJekyllSearch({
searchInput: document.getElementById('search-input'),
resultsContainer: document.getElementById('results-container'),
json: '/search.json',
searchResultTemplate: '<li><a href="{url}" title="{desc}">{title}</a> <span>{date}</span></li>',
noResultsText: '没有搜索到文章',
fuzzy: false
})
</script>
其中第一部分用于创建搜索输入框,第二部分为调用上一步提到的搜索js文件,第三部分为展示搜索到的结果。
参考:
- https://blog.webjeda.com/instant-jekyll-search/
- https://github.com/christian-fei/Simple-Jekyll-Search/wiki
- https://github.com/christian-fei/Simple-Jekyll-Search
- https://www.chenkaihua.com/2015/11/16/jekyll-search-via-simple_jekyll_search/
其他
语法高亮
Jekyll 默认采用 Rouge 高亮语法, _config.yml 设置如下:
highlighter: rouge
Rouge 兼容 Pygments 的主题,因此在 Pygments 主题预览 选择某一主题,比如选择 emacs 风格,将其 CSS 文件下载下来,并放入 assets/,然后在 _layouts/post.html 中调用即可:
<link rel='stylesheet' href='/assets/emacs.css' type='text/css'>
也可以采用 rougify 的方法,参见https://blog.walterlv.com/post/available-themes-of-rouge-style.html
另外需要注意的是,在输入含有模板语言的代码块时,代码里面的内容可能被执行,此时可采用 raw tag 处理,见https://tosbourn.com/liquid-raw-syntax/及https://ozzieliu.com/2016/04/26/writing-liquid-template-in-markdown-with-jekyll/。
更多参见:
数学公式
在 _includes/ 里面新建 mathjax.html,添加如下内容:
{% if page.mathjax %}

<script type="text/x-mathjax-config">
  MathJax.Hub.Config({
    tex2jax: {
      inlineMath: [ ['$','$'], ["\\(","\\)"] ],
      displayMath: [ ['$$','$$'], ["\\[","\\]"] ],
      processEscapes: true
    },
    displayAlign: "left",
    CommonHTML: { linebreaks: { automatic: true, width: "container"  } }
  });
</script>

{% if page.mathnos %}
<script type="text/x-mathjax-config">
  MathJax.Hub.Config({
    TeX: {
      equationNumbers: { autoNumber: "all" },
      TagSide: "left"
    }
  });
</script>
{% endif %}

<script type="text/javascript" charset="utf-8"
  src="https://cdn.jsdelivr.net/npm/mathjax@2/MathJax.js?config=TeX-AMS_CHTML">
</script>

{% endif %}
上述对MathJax的引用和设置参见 https://stackoverflow.com/a/59147170。其中 displayAlign: "left" 设置行间公式左对齐,TagSide (注意这里不是 tagSide ) 设置公式编号放在左边。linebreaks 可让过长公式换行。
因为不想要全站加载 MathJax,可预见数学公式主要在 post 里面使用,因此修改 _layouts/post.html 如下:
{% include mathjax.html %}
当文章 YAML front-matter 中设置 mathjax: true 时,才会加载数学公式渲染,如果同时设定 mathnos: true,则会开启行间公式自动编号。
参考:
- https://mathjax-chinese-doc.readthedocs.io/en/latest/configuration.html
- https://github.com/mmistakes/minimal-mistakes/issues/735
- https://stackoverflow.com/questions/59141529/mathjax-equation-numbers-do-not-show-using-jekyll-on-github-pages
- https://docs.mathjax.org/en/v2.7-latest/options/input-processors/TeX.html
- https://docs.mathjax.org/en/v2.7-latest/tex.html
- https://stackoverflow.com/a/15237320
- https://stackoverflow.com/questions/29893923/how-to-make-formula-with-mathjax-responsive
- https://moodle.org/mod/forum/discuss.php?d=389730
新窗口打开外部链接
Jekyll 默认采用 Kramdown 作为 Markdown 解析器,提供了打开外部链接方式:
[link](url){:target="_blank"}
此外,可以通过 jQuery 将全部外链设置为新窗口打开:
$(document).ready(function() {

   $("a[href^=http]").each(function(){

      // NEW - excluded domains list
      var excludes = [
         'excludeddomain1.com',
         'excludeddomain2.com',
         'excluded.subdomain.com'
      ];
      for(i=0; i<excludes.length; i++) {
         if(this.href.indexOf(excludes[i]) != -1) {
            return true; // continue each() with next link
         }
      }

      if(this.href.indexOf(location.hostname) == -1) {

           // attach a do-nothing event handler to ensure we can 'trigger' a click on this link
           $(this).click(function() { return true; });

           $(this).attr({
               target: "_blank",
               title: "Opens in a new window"
           });

           $(this).click(); // trigger it
      }
   })
});
需要额外加载 jQuery。
参考:
- https://stackoverflow.com/a/4705645
- https://stackoverflow.com/questions/12071254/open-all-external-links-open-in-a-new-tab-apart-from-a-domain
- https://gist.github.com/wpscholar/4637176
添加目录
下载 toc.html,将其放于 _includes/ 下,然后在 _layouts/post.html 中 {{ content }} 前面加上:
{% include toc.html html=content %}
更多参见:
日期格式
post 的日期可通过如下命令获取:
{{ post.date|date: "%Y-%m-%d" }}
其中,post.date 为以字符串给出的完整的博文日期,date: "%Y-%m-%d" 通过 date filter 设置其格式为 年-月-日,如 2020-04-25。
更多格式参见
- https://learn.cloudcannon.com/jekyll/date-formatting/
- http://alanwsmith.com/jekyll-liquid-date-formatting-examples
- http://strftime.net/
Kramdown 设置
Kramdown 更多设置可在 _config.yml 进行,如:
kramdown:
  input: GFM
  syntax_highlighter: rouge
  extensions: fenced_code_blocks
  math_engine: mathjax
  parse_block_html: true
参考: